笔记
| 报纸订阅与发布 | 关键 |
|---|---|
| 1.订阅报纸 | 住址 |
| 2.邮递员送报纸 | 报纸 |
| 消息订阅与发布 | 关键 |
|---|---|
| 1.订阅消息 | 消息名 |
| 2.发布消息 | 消息内容 |
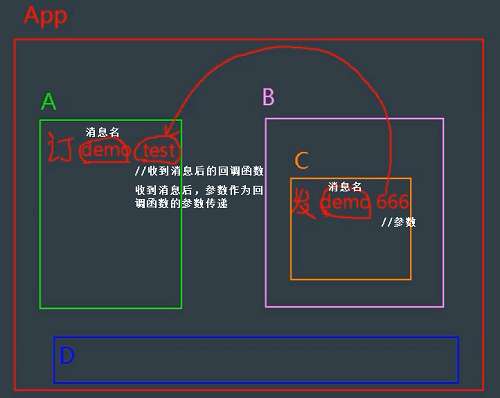
下图为消息订阅与发布的概述:

原生Vue没有消息与订阅的功能,需要借助第三方库: pubsub.js //publish-发布 subscribe-订阅
安装该库:
npm i pubsub-js用其它库也可以。
安装过程:
vue_test> npm i pubsub-js
added 1 package in 3s
119 packages are looking for funding
  run `npm fund` for details
注意:
消息订阅与发布挺好的,因为Vue原生的 全局事件总线 的模型和 消息订阅与发布差不多,所以 消息订阅与发布 实际用的不多。
源码
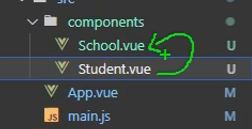
练习内容: 下图绿色线,Student(提供数据) School(需要数据)
components\School.vue
<template>
    <div class="school">
        <h2>学校名称:{{name}}</h2>
        <h2>学校地址:{{address}}</h2>

        <!--button @click="sndSchoolName">把学校名给App</button-->
    </div>
</template>

<script>
    //087
    //引入库
    import PubSub from 'pubsub-js';

    export default {
        name:'SchoolVue',

        props:['getSchoolName'],

        data() {
            return {
                name:'尚硅谷',
                address:'北京',
            }
        },

        methods:{
            demo(a,b){
                console.log('有人发布了 hello 消息, hello 消息的回调执行了',a,b, this)
            }
        },

        //084
        mounted(){
            console.log('School', this.x)

            //绑定自定义事件 hello:
            //如果这样在 main.js 中写 Vue.prototype.x = {a:1, b:2}:立马报错。因为 Vue的原型对象上的x 没有 $on ,就是一个普通的Object对象。 如果还往上找,就到了 Object原型,也没用 $on
            //在 School组件中 绑定了一个 hello 事件:
            //this.x.$on('hello',(data)=>{
            //085 配合写法2的写法:
            /*this.$bus.$on('hello',(data)=>{

                console.log('我是School组件,收到了数据',data)
            })*/
            //this 是 School组件的实例对象,它可以调用 $on 的原因: 组件在 Vue原型对象 上。

            //087 订阅消息
            //每次订阅,会有不同的pubid
            /*this.pubid = PubSub.subscribe('hello', //消息名
                            //a-收到的消息名, b-收到的消息内容
                            function(a,b){    //收到消息后的回调函数
                                console.log(this) //this : undefined 因为 PubSub ∈ 第三方库 。 如果要解决this正常执行当前组件,需要使用箭头函数
                                console.log('有人发布了 hello 消息, hello 消息的回调执行了',a,b)
            })*/
            //订阅消息时,回调函数的正常写法1: 使用箭头函数
            /*this.pubid = PubSub.subscribe('hello', //消息名
                            //a-收到的消息名, b-收到的消息内容
                            //使用箭头函数
                            (a,b)=>{    //收到消息后的回调函数
                                console.log(this) //this : vc
                                console.log('有人发布了 hello 消息, hello 消息的回调执行了',a,b)
            })*/
            //订阅消息时,回调函数的正常写法2: 使用正规写法
            //另外一种正常写法: 将回调函数写到 methods 中
            this.pubid = PubSub.subscribe('hello', this.demo)
        },

        //085
        //如果哪天当前组件销毁了,那么就需要在销毁前释放上面绑定的自定义事件 hello:
        beforeDestroy(){
            //this.$bus.$off('hello')

            //087 取消消息的订阅
            PubSub.unsubscribe(this.pubid)
        }
    }
</script>


<!-- 我们在 vue组件中写的样式,最终都被汇总在一起。此时容易出现一个问题:样式名冲突。 为了解决这个问题: 添加 scoped,表示其中的样式只负责本组件 -->
<style scoped>
    .school{
        background-color: skyblue;

        padding: 5px;
    }
</style>
components\Student.vue
<template>
    <!-- 这里设计为只有一个根元素,本节的用到的原因之一: 给 Student组件 绑定 click.native 原生事件时, 会交给Student组件的最外层 div 。-->
    <div class="student">
        <h2 >学生姓名:{{name}}</h2>
        <h2 >学生性别:{{sex}}</h2>

        <button @click="sndStdntName">把学生名给School组件</button>
    </div>
</template>

<script>
    //087
    //引入库
    import PubSub from 'pubsub-js';

    export default {
        name:'StudentVue',
        data() {
            return {
                name:'张三',
                sex:'男',

            }
        },

        //084
        mounted(){
            console.log('Student', this.x)
        },

        methods:{
            sndStdntName(){
                //this.x.$emit('hello', 777)
                //配合写法2的写法:
                //this.$bus.$emit('hello', this.name)

                //087
                PubSub.publish('hello', //消息名
                            666            //消息内容
                )
            }
        }

    }
</script>

 <style scoped>
    .student{
        background-color: pink;

        padding: 15px;

        margin-top: 30px;
    }
</style>