笔记
第108节
https://www.bilibili.com/video/BV1Zy4y1K7SH?&p=108
1. 安装 Vuex
自2022-02-07 Vue3成为默认版本,Vuex也从3更新到了4版本,而我们此处学习的是Vue2 。
我们现在如果直接使用 npm i vue 就是 Vue3 了,npm i vuex 安装的就是 Vuex4
Vue 和 Vuex 的版本关系:
| Vue版本 | Vuex版本 |
|---|---|
| Vue2 | Vuex3 |
| Vue3 | Vuex4 |
目前如果直接安装会被安装为 Vuex4 ,而 Vuex4 只能在 Vue3 中使用。Vue2,只能用 Vuex3
安装 Vuex3的方法:
npm i vuex@3
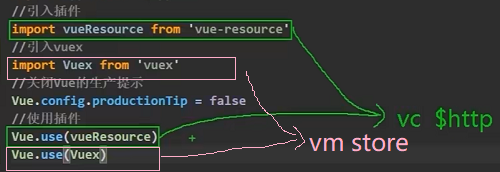
上图意在告诉我们:
引入并使用 vue-resource 插件后,对我们的影响: 可以在 vc 中使用 $http
引入并使用 vuex 插件后,对我们的影响:创建 vm 的时候,可以传入 store 配置项
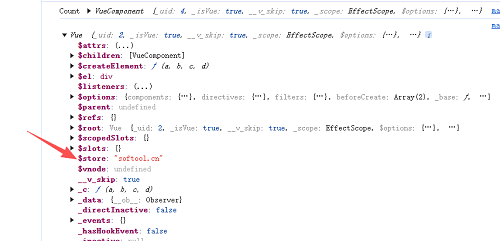
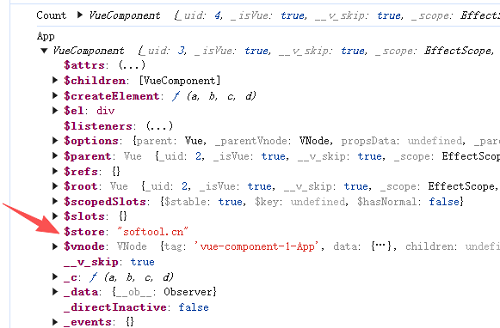
当我们 Vue.use(Vuex) 的时候,就可以在 创建vm 时 使用 store 配置项 了,使用之后,就可以将 store 传递给 vm 和 各个 vc 。
vm身上,如下图所示:

vc身上,如下图所示:

创建 真store 的2种方法
在 src 目录下 创建 vuex/store.js
在 src 目录下 创建 store/index.js ∈ 官网写法
经验:只要之前干过 Vue 就应该知道 看到 store 就使用的是 Vuex, 即:见到了 store 就如同见到了 Vuex
重要文件源码
main.js
//引入Vue
import Vue from 'vue'
//引入App
import App from './App.vue'
//引入插件
import vueResource from 'vue-resource'

//引入Vuex
//已放到了 index.js 去引入和使用vuex
//import Vuex from 'vuex'


//关闭Vue的生产提示
Vue.config.productionTip = false
//使用插件
Vue.use(vueResource)
//已放到了 index.js 去引入和使用vuex
//Vue.use(Vuex)

//引入store
//import store from './store/index'
//★ 如果脚手架认识 index.js 那么可以省略index.js , 所以可简写为:
import store from './store'
//注意:
//Vue会把 引入的文件 全部汇总放到上方,按引入的顺序加载。 所以即使你在这里写了一个 import *** from *** ,那么也会被汇总到上面。

//创建vm
const vm = new Vue({
    el:'#app',
    render: h => h(App),

    //此处为了演示 Vuex, 定义了一个 假store 。 因为真 store 管理着3个人: Actions/Mutations/State 2个API: Dispatch/Commit
    //store:'softool.cn',
    //将上面引入的store,作为value
    //key为store用来传递给vm 和 各个vc
    //完整形式:
    //store:store,
    //上面的写法触发了对象的简写形式,所以可以写为:
    //简写形式:
    store,

    beforeCreate() {
        Vue.prototype.$bus = this
    }
})

//验证: vm身上有没有 store
//console.log(vm)
App.vue
<template>
    <div>
        <Count/>
    </div>
</template>

<script>
    import Count from './components/Count'
    export default {
        name:'App',
        components:{Count},
        mounted() {
            //验证: vc身上有没有 store
            console.log('App',this)
        },
    }
</script>
store\index.js
//该文件用于创建Vuex中最为核心的store
import Vue from 'vue'

//引入Vuex
import Vuex from 'vuex'
//使用Vuex插件
//注意:
//    保证 Vue.use(Vuex) 要放在 new .Store()对象前面。 否则会提示: Uncaught Error: [vuex] must call  Vue.use(Vuex) before creating a store instance.
Vue.use(Vuex)

//准备actions --- 用于 响应组件中的动作
const actions = {
    /* jia(context,value){
        console.log('actions中的jia被调用了')
        context.commit('JIA',value)
    },
    jian(context,value){
        console.log('actions中的jian被调用了')
        context.commit('JIAN',value)
    }, */
    jiaOdd(context,value){
        console.log('actions中的jiaOdd被调用了')
        //★ 在 actions 中只能通过第0个参数context 取 .state对象 里面的 sum属性!
        if(context.state.sum % 2){
            context.commit('JIA',value)
        }
    },
    jiaWait(context,value){
        console.log('actions中的jiaWait被调用了')
        setTimeout(()=>{
            context.commit('JIA',value)
        },500)
    }
}
//准备mutations --- 用于 操作(修改/加工/维护)状态数据(state)
const mutations = {
    JIA(state,value){
        console.log('mutations中的JIA被调用了')

        //★ 在 mutations 中可以直接使用第0个参数 state对象 取里面的 sum属性!
        state.sum += value
    },
    JIAN(state,value){
        console.log('mutations中的JIAN被调用了')
        state.sum -= value
    }
}
//准备state --- 用于 存储数据
const state = {
    sum:0 //当前的和
}

//vm new Vue()
//创建 store
//完整写法:
/*const store = new Vuex.Store({ //需要传入配置对象
    actions:actions,
    mutations:mutations,
    state:state,
})*/
//简写:
//创建并暴露store 此处∈默认暴露
export default new Vuex.Store({
    //3个配置项
    actions,
    mutations,
    state,
})